51łÔąĎ


Brightspace Template


As a way to jumpstart your online course site building, a team of educational developers and instructional designers developed a model course site structure, informally known as the Brightspace template. The template aims to provide students with a consistent learning environment and to support faculty in the set up and design of their online course spaces.

Framed around the principles of Universal Design for Learning (UDL) and other pedagogical strategies considered best practice, the template includes a set of homepage widgets; a course orientation; example welcome messages, discussion prompts, and student feedback surveys; built-in supports for both students and faculty; and more. Implementing the template is optional.

Fully customizable templates are available to instructors across Dalhousie in Brightspace through a self-enrolment process (see Self-Registration Instructions, below). There is one basic template for general use, as well as three, more colourful variations:
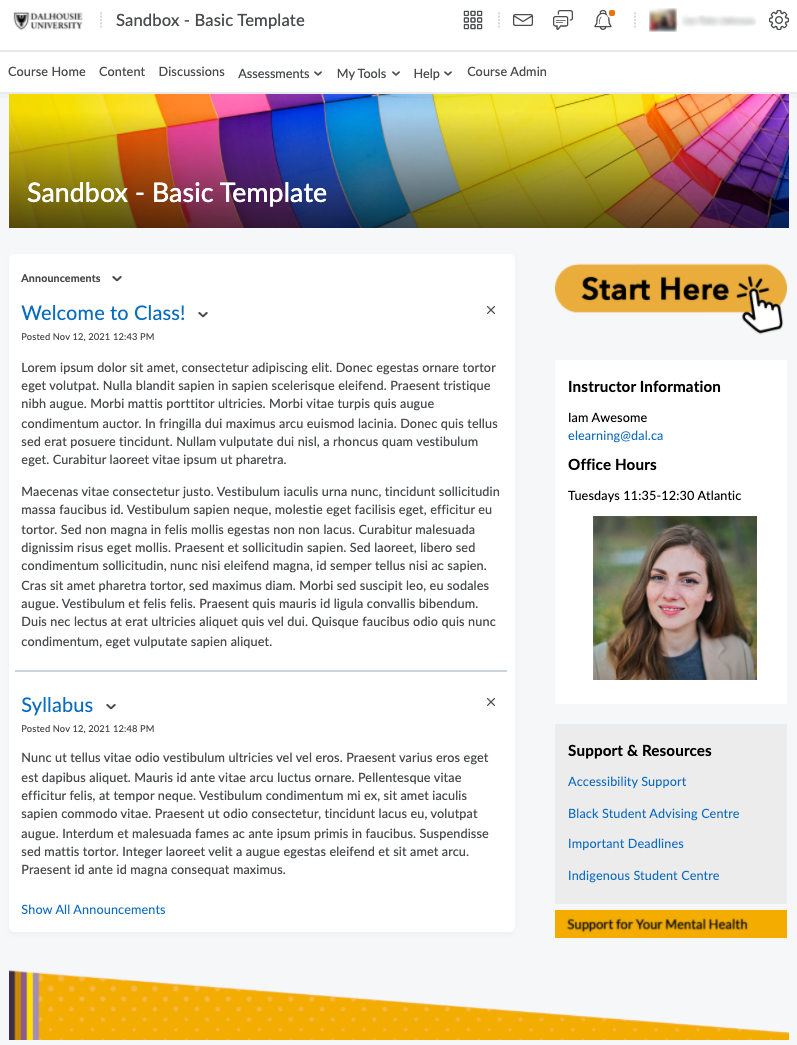
screenshot of homepage with Brightspace template implemented

Template – General Use

Yellow colours used in General Use template

Template – General Use (Blue)

Blue colours used in General Use (Blue) template

Template – General Use (Purple)

Purple colours used in General Use (Purple) template

Template – General Use (Green)

Green colours used in General Use (Green) templateĚý

Self-Registration Instructions

The steps to self-register to access the templates are:

  1. Log into Brightspace with your NetID at . 
  2. Go to menu item Academic Support > . 
  3. Click on the link(s) for any of the Brightspace sites that begin with, “Template – General Use...”
  4. Press the Register button. 
  5. Your registration information will be prefilled for you. Press Submit
  6. To complete the process, press Finish
  7. You can enter the course now by using the “Go to course offering...” link or press Done to return to the Brightspace homepage. You will receive an email confirmation of your enrolment.

Ěý

Implementing the Brightspace Template

To implement the template, use any of the tutorials that follow. Other forms of support include:

  • Educational Developers with the Centre for Learning and Teaching, who can assist with writing learning outcomes, developing student assessments, and other aspects of course design. Contact onlinepedagogy@dal.caĚýto schedule a consultation.
  • Instructional Technologists with Academic Technology Services, who can assist with technical support and training of Dalhousie’s instructional technologies, such as Brightspace, Panopto, Collaborate, and more. Contact intech@dal.ca for support or visit the .

Note: Agriculture has its own set of customized Brightspace templates. Please contact the Educational Technology and Design (ETD) office by email (etd@dal.ca) for more information.
Ěý

How to Use a Brightspace Template

Adding a template to your course site

  1. From your own course site, navigate to the Course Admin menu.
  2.  Click the Import / Export / Copy Components link.
  3. Press the Search for offering button.
  4. In the pop-up window, do a search for: Template - General Use.
  5. Select the template from the list and press Add Selected.
  6. On the next screen, press Copy All Components or select components individually.
  7. You will get a message once the copy process is complete. The template has now been added to your course site. You can now upload content or customize as desired.

Video walkthrough of the steps above:  [1:00]

Adding a template to a course with existing content

You can add the template to a course site that you have already developed. Adding the template will not erase any setup you’ve already completed but append to it.

  1. From your own course site, navigate to the Course Admin menu.
  2. Click the Import / Export / Copy Components link.
  3. Press the Search for offering button.
  4. In the pop-up window, do a search for the template you’d like to copy. The template for general use (i.e., not faculty specific) is named: Template - General Use
  5. Select the template from the list and press Add Selected.
  6. On the next screen, press Copy All Components or select components individually.
  7. You will get a message once the copy process is complete. The template has now been added to your course site.

At this point you can move or delete content modules or transfer content items between them. (The first module of the template is named Orientation: Start Here.) The same is true of Discussions. Reorder or delete discussions to integrate your pre-existing forums and topics with the ones provided through the template.

Video walkthrough of the steps above:  [1:36]

Adding select components from a template to your course site

  1. From your own course site, navigate to the Course Admin menu.
  2. Click the Import / Export / Copy Components link.
  3. Press the Search for offering button.
  4. In the pop-up window, do a search for the template you’d like to copy. The template for general use (i.e., not Faculty specific) is named: Template - General Use
  5. Select the template from the list and press Add Selected.
  6. On the next screen, press Select Components.
  7. Under Choose Components to Copy, select the components to add to your course site, choosing either Copy all items or Select individual items to copy. Note: If you will be adding the template widgets to your course site, you will need to copy the images included in the template. To do so, be sure to select the Course Files component and either Copy all items, or if you’ve chosen to select individual items to copy, be sure to copy the Course_Images folder.
  8. When you have finished selecting course material, press the Finish button.
  9. You will get a message once the copy process is complete. The template components have now been added to your course site. You can now upload content or customize as desired.

Video walkthrough of the steps above:  [1:07]

Customizing your course homepages and widgets


Activating the Template Homepage

After you have added the template to your course site, you may notice that the template homepage is not the one showing at Course Home. To activate the template homepage:

  1. Choose Manage Homepages from the menu (three dots) at bottom right of the course site homepage.
  2. In the Active Homepage drop-down menu, choose Brightspace Course Homepage – Template.
  3. Press Apply.

Customizing the Course Banner

  1. Choose Change Image from the menu (three dots) at upper, right of the course site homepage.
  2. Search for an image.
  3. Press the Use this image.
  4. If you would like to upload your own image or use Dalhousie-branded template banner, choose Change Image from the menu (three dots) at upper, right of the course site homepage.
  5. Press Upload.
  6. You can choose to upload an image from your computer or from the Course Offering Files, in the Course_Images folder, choose “BSpTemplate12-week-banner.jpg.”
  7. Press Add.

Customizing the Widget Style

Upon adding a template to your course site, you may notice a white rectangle around the homepage widgets. To remove this white rectangle:

  1. Choose Edit this Homepage from the menu (three dots) at bottom right of the course site homepage.
  2. Press the widget you’d like to style and deselect Display widget container style.
  3. Press Hide Properties to continue to style widgets on your homepage.
  4. When finished, press Save and Close.

Adding a Custom Footer

At the bottom of the course site homepage will be a standard footer. To use one customized with your faculty name:

  1. Choose Edit this Homepage from the menu (three dots) at bottom right of the course site homepage.
  2. Press Add Widgets.
  3. In the search bar, type "footer" and select the footer you’d like to use. Press Add. Style the footer widget you just added.
  4. Delete the FOOTER: Plain by clicking the X in the upper right-hand corner of the widget.
  5. When finished, press Save and Close.

Removing and Rearranging Widgets

  1. Choose Edit this Homepage from the menu (three dots) at bottom right of the course site homepage.
  2. To remove a widget, click the X in its upper right-hand corner.
  3. To move a widget, drag to new location, as indicated by the horizontal line.
  4. To add new widgets, press Add Widgets and use the search bar.
  5. When finished, press Save and Close.

Customizing Widget Content

Some of the widgets require customization, such as Instructor Info, Syllabus, and Synchronous Session Link. To customize widget content:

  1. Navigate to Course Admin.
  2. Click the Widgets link.
  3. In the Custom Widget List, find the widget you want to customize. (Most begin with TEMPLATE.)
  4. Click the Edit (pencil) icon.
  5. In the Content tab, make your customizations. To add a photo, click the Insert Image icon. From the My Computer page, press Upload, find a photo from your computer, and click Add.
  6. Press Save and Close when finished.

Video walkthrough of the steps above:  [3:31]